The most common assumption about overnight oats is that you can dump rolled oats and milk into a slow cooker before bed, set it to low, and wake up to something creamy and warm. In practice, that exact setup is one of the more reliable ways to end up with a pot of pasty, scorched-edged mush — not because overnight oats are difficult, but because rolled oats and the low-and-slow environment of a slow cooker are a poor match for each other. The method works, but only once you understand which kind of oat you’re working with and what the appliance does to it over eight hours.
This guide walks through the myths beginners carry into their first batch and the realities that replace them, so the first attempt has a fighting chance of being edible rather than a lesson in what not to do.
Myth: Any oat works the same way
Reality: the three main types of oats behave so differently in a slow cooker that using the wrong one is the single biggest reason a first batch fails.
Rolled oats (old-fashioned) are steamed and flattened, which pre-cooks them partway. They need only a few minutes in hot liquid to soften. Eight hours on low turns them into a uniform paste with no texture left — edible, but closer to wallpaper glue than breakfast.
Quick oats are rolled even thinner and are the worst candidate of the three. They break down almost completely.
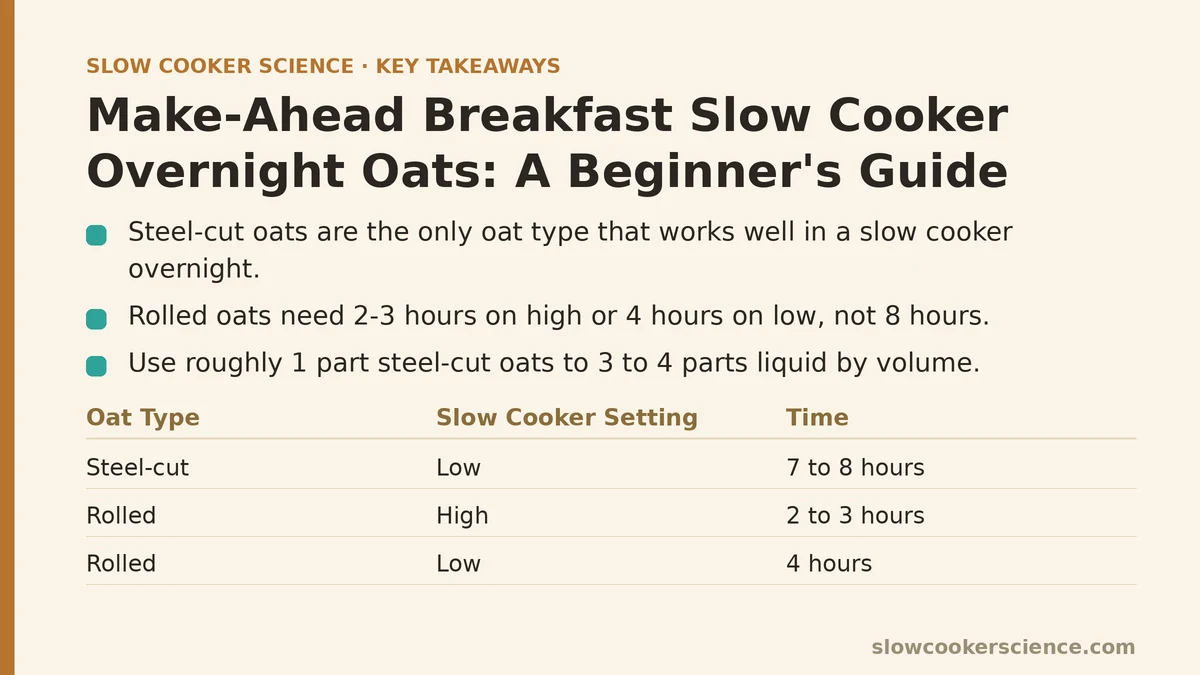
Steel-cut oats are the ones to reach for. They’re chopped rather than flattened, so their starches are still locked inside a firm, intact structure that needs hours of moist heat to soften. This is exactly what a slow cooker is built to provide. A batch of steel-cut oats set before bed and cooked 7 to 8 hours on low comes out creamy with a slight chew, which is the texture most people are hoping for when they picture slow cooker oats.
If you only have rolled oats on hand, don’t abandon the idea — just shift the timeline. Rolled oats work better on a 2 to 3 hour high setting or a 4 hour low setting, added the same morning rather than the night before. It’s a different recipe, not a substitute.
Myth: More liquid is safer than less
Reality: overwatering is the second-most-common beginner mistake, and it’s an easy trap because the instinct is to add extra liquid “just in case.”
A workable starting ratio for steel-cut oats in a slow cooker is roughly 1 part oats to 3 to 4 parts liquid by volume. For a typical 6-quart cooker, that might look like 1 cup of steel-cut oats to 3 to 4 cups of milk, water, or a mix of both. The oats absorb a lot, and a slow cooker traps nearly all the moisture that would otherwise evaporate, so the liquid you start with largely stays in the pot.
The mistake shows up in two directions. Add too much and you get a thin, soupy result that never thickens properly, because the oats can only absorb so much before they hit their limit. Add too little and the edges dry out and stick to the insert, leaving a ring of scorched oat that has to be scrubbed off later. Splitting the difference — 3.5 cups of liquid per cup of steel-cut oats — lands most batches in a workable zone, and you can adjust up or down by half a cup on the next attempt.
A splash of milk or cream stirred in after cooking is a better way to loosen the final texture than adding more liquid upfront, since it doesn’t risk pushing the oats past their absorption limit during the cook.
Myth: You need a programmable slow cooker to do this overnight
Reality: a basic manual slow cooker works fine, but a programmable one with a “keep warm” auto-switch removes one specific risk.
The risk is overshooting. Steel-cut oats on low for 7 hours are tender and creamy. The same batch left on low for 10 or 11 hours — because you slept in or got distracted — starts to dry out around the edges and take on a denser, more compacted texture. It’s not ruined, but it’s noticeably less pleasant.
If your slow cooker has a programmable timer that switches to “keep warm” when the cook time ends, set it to 7 hours on low and let the keep-warm mode hold the pot until you’re ready. If yours is manual, either accept that you’ll want to be near the kitchen around the 7 to 8 hour mark, or use a plug-in outlet timer as a workaround. Either way, the difference between a 7-hour batch and an 11-hour batch is real, and worth planning around.
Myth: You can add the toppings the night before
Reality: some mix-ins survive the overnight cook fine; others turn bitter, mushy, or disappear entirely.
Safe to add at the start:
- A pinch of salt, which seasons the oats from within
- A cinnamon stick, which infuses gently and can be fished out
- Dried fruit like raisins or chopped dates, which plump up nicely
- A small pat of butter or a spoonful of coconut oil, which helps keep the edges from sticking
Better added just before serving:
- Fresh fruit like sliced bananas, berries, or diced apple, which lose their texture and brightness overnight
- Nuts and seeds, which go soft and lose their crunch
- Honey, maple syrup, or brown sugar, which can scorch slightly against the insert wall over long heat
- A splash of milk or cream to adjust the final consistency
The cleanest approach is to cook the oats plain with just salt, a fat, and maybe a cinnamon stick, then set out the toppings on the counter so each person can build their own bowl. This also solves the problem of a single batch trying to please everyone in the household.
Myth: Greasing the insert is optional
Reality: for overnight oats, it’s one of the simplest steps that prevents the most annoying failure.
Even with a nonstick insert, steel-cut oats left cooking for 7 hours tend to leave a ring of stuck, dried oat around the waterline where the surface meets the insert wall. A light coating of butter or neutral oil applied with a paper towel before the oats go in makes cleanup dramatically easier and reduces the chance of a scorched edge flavor bleeding into the rest of the batch.
It takes about thirty seconds and is worth doing every time.
What a good batch looks and smells like
When you lift the lid in the morning, a well-cooked batch of steel-cut oats should look creamy and slightly loose, with visible individual grains suspended in a thick, glossy base. It should smell sweet and oaty, with whatever aromatics you added — cinnamon, vanilla, a hint of butter — coming through clearly.
Stir it well before serving, since the oats settle and the liquid rises during the long cook. A batch that looks watery on top is often fine underneath; a batch that looks uniformly thick and dry is a sign it cooked too long or started with too little liquid.
If the texture is thicker than you want, stir in a splash of warm milk or water a quarter cup at a time until it loosens. If it’s thinner than you want, let it sit covered off the heat for 5 to 10 minutes — the residual heat and the oats’ continued absorption will firm it up without any further cooking.
The variables worth adjusting on your second batch
The first batch is a baseline. Once you’ve tasted it, you have three levers to pull:
Liquid amount. Too thick? Add half a cup next time. Too thin? Reduce by half a cup.
Cook time. Too firm? Add 30 minutes on low. Too soft or dry around the edges? Subtract 30 minutes.
Oat-to-liquid ratio. If the flavor is right but the texture is off, a small tweak here — say from 1:3.5 to 1:3.75 — often resolves it without changing anything else.
Making one change at a time makes it much easier to tell which variable moved the result. Changing all three at once on the second attempt usually just produces a new mystery to solve.
A note on food safety
Overnight oats sit in a warm appliance for many hours, which makes a few basics worth stating plainly. Keep the total time in the temperature range where bacteria grow most readily — roughly between 40°F and 140°F — as short as possible. A slow cooker on low typically holds food above 140°F once it’s come up to temperature, but the first hour or two while the pot is warming is the window to be mindful of. If you’re adding milk or dairy, use it fresh, and refrigerate any leftovers within two hours of the oats finishing their cook. Reheat portions to steaming before eating.
If the oats have an off smell or a slick, stringy texture when you lift the lid, discard them rather than tasting to check. It’s not worth the risk over a batch of breakfast.
Options if you don’t want to commit to steel-cut
Three realistic paths for a beginner:
Steel-cut overnight. The classic slow cooker method described above. Best texture, requires planning the night before, needs steel-cut oats specifically.
Rolled oats, same morning. A 2 to 3 hour high cook or 4 hour low cook using rolled oats and a 1:2.5 liquid ratio. Faster, more forgiving of timing, less creamy.
Overnight oats in the refrigerator. No slow cooker involved — oats and liquid mixed in a jar and left cold overnight. Simplest of all, but produces a cold, chewy result rather than a warm, creamy one. Worth knowing as an alternative when the slow cooker is already in use for something else.
Each has its place. The slow cooker version earns its keep when you want a warm, hands-off breakfast waiting for you, and you’re willing to plan for it the night before.
What’s your setup — steel-cut, rolled, or still deciding? If you share your slow cooker size and how many servings you want, the liquid ratio and timing can be adjusted to fit.
Related guides: Meal-Prep Breakfast Slow Cooker: Overnight Oats and Egg Bites Step by Step, Slow Cooker Overnight Oatmeal and Breakfast Recipes: A Troubleshooting Guide, and Freezer-to-Slow-Cooker Meal Prep: A Beginner’s Step-by-Step Guide.